How to Add Google Maps to Your Website
How to Add a Google Map to Your Site: A Step-by-Step Developer’s Guide
Embedding an interactive Google Map on your website is a proven way to help visitors find your physical location, increasing credibility and customer visits. While Google offers a basic embed feature, creating a custom, fully-integrated map that matches your site’s design requires a more technical approach.
This guide will walk you through the professional method of adding a custom Google Map using the official Maps JavaScript API.
This method requires a Google Cloud account, enabling APIs, and working with HTML, CSS, and JavaScript
Method 1: The Custom Google Maps JavaScript API Method
This approach gives you full control over the map’s appearance and behavior.
Step 1: Set Up a Google Cloud Project and API Key
- 1. Access Google Cloud Console: Go to the [Google Cloud Console](https://console.cloud.google.com/).
- 2. Create a New Project: Click the project dropdown at the top and select “New Project”. Give it a name like “My Website Map”.
- 3. Enable Billing: You must enable billing on your project. Google provides a $200 monthly credit, which is more than enough for most website maps unless you have extremely high traffic.
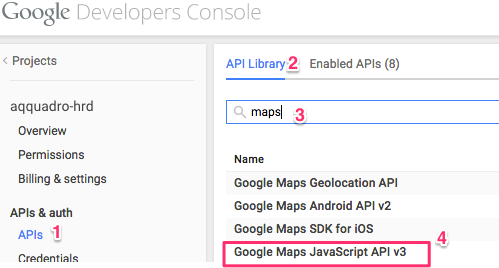
- 4. Enable the Maps JavaScript API: Navigate to “APIs & Services” > “Library”. Search for “Maps JavaScript API”, click on it, and press the “Enable” button.
[Google Cloud Console API Library showing the Enable button for the Maps JavaScript API] You must enable the correct API for the map to function.
- 5. Create Your API Key: Go to “APIs & Services” > “Credentials”. Click “Create Credentials” and select “API key”.
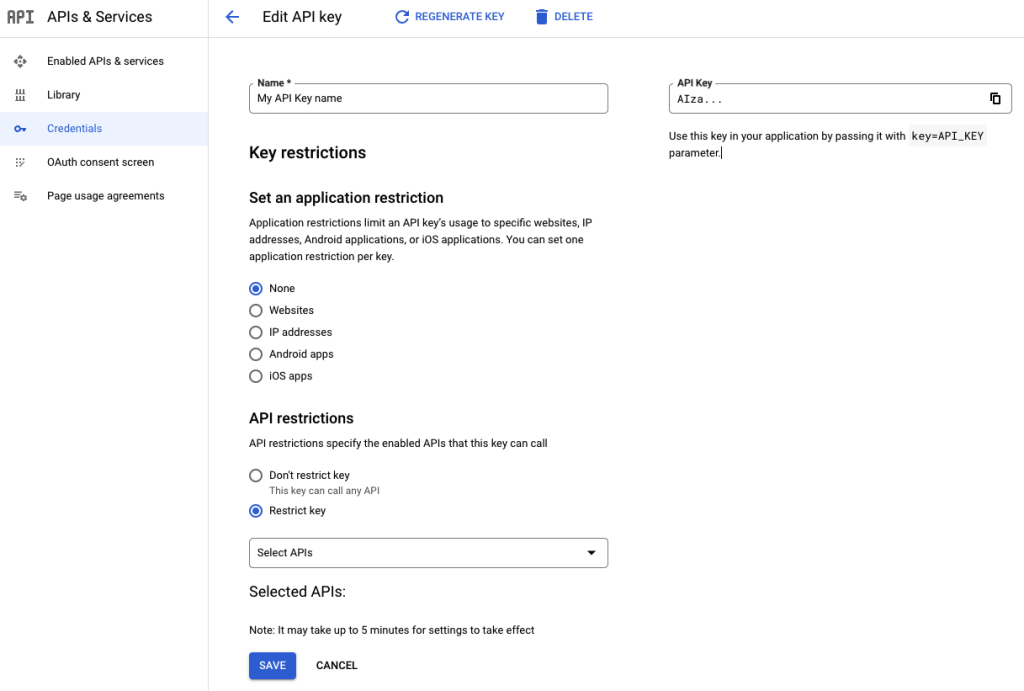
- 6. Restrict Your API Key (Essential for Security): Immediately after creation, click on the API key and set restrictions. Under “Application restrictions,” choose “HTTP referrers”, and under “API restrictions,” restrict the key to the “Maps JavaScript API”. Add your website’s domain (e.g., `*.yourdomain.com/*`) to prevent unauthorized use and potential charges.
[API Key restriction settings in Google Cloud Console] Restricting your API key is a critical security step.
Step 2: Build the HTML and JavaScript Code
Now, let’s create the map. The following code creates a responsive, centered map with a marker and an info window that pops up when clicked.
Create a new file called `map.html` and add this code:
<!DOCTYPE html>
<html lang="en">
<head>
    <meta charset="UTF-8">
    <meta name="viewport" content="width=device-width, initial-scale=1.0">
    <title>Our Location</title>
    <!-- Load the Google Maps API with your key -->
    <script async defer src="https://maps.googleapis.com/maps/api/js?key=YOUR_API_KEY_HERE&callback=initMap"></script>
    <style>
        /* Map container styling */
        #map-container {
            width: 100%;
            max-width: 800px;
            margin: 20px auto;
            border: 1px solid #ddd;
            border-radius: 8px;
            overflow: hidden;
            box-shadow: 0 4px 12px rgba(0, 0, 0, 0.1);
        }
        /* The map must have a defined height */
        #map {
            height: 450px;
            width: 100%;
        }
    </style>
</head>
<body>

    <h2>Find Us Here</h2>
    <div id="map-container">
        <div id="map"></div>
    </div>

    <script>
        // The initMap function is called by the callback in the API script tag
        function initMap() {
            // Define the coordinates for your business location
            const businessLocation = { lat: 40.728157, lng: -73.794853 }; // Example: New York

            // Create a new map instance and place it inside the #map div
            const map = new google.maps.Map(document.getElementById("map"), {
                zoom: 15, // Closer zoom level
                center: businessLocation, // Center the map on your location
                styles: [ // Optional: Apply a custom style to make the map minimalist
                    {
                        "featureType": "all",
                        "stylers": [{ "saturation": -80 }] // Desaturate colors for a cleaner look
                    }
                ]
            });

            // Create a marker and place it on the map
            const marker = new google.maps.Marker({
                position: businessLocation,
                map: map,
                title: "Our Store Front", // Text that appears on hover
                animation: google.maps.Animation.DROP // Marker drops into place
            });

            // Create an info window with your business details
            const infowindow = new google.maps.InfoWindow({
                content: `
                    <div style="padding: 8px;">
                        <strong>Our Awesome Store</strong><br>
                        123 Main Street<br>
                        New York, NY 10001<br>
                        <a href="https://goo.gl/maps/example" target="_blank">Get Directions</a>
                    </div>
                `
            });

            // Open the info window when the marker is clicked
            marker.addListener('click', () => {
                infowindow.open(map, marker);
            });
        }
    </script>
</body>
</html>
Code language: HTML, XML (xml)
Crucial Step: Replace `YOUR_API_KEY_HERE` in the script tag with the actual restricted API key you generated in Step 1.
Step 3: Integrate the Map into Your Website
- 1. For a Simple HTML Site: You can upload the `map.html` file to your server and link to it, or copy the entire code block (from `<!DOCTYPE html>` to `</html>`) into an existing page’s HTML.
- 2. For a CMS like WordPress: Use a “Custom HTML” block or a code snippet plugin. Paste the code into the block. The map will render where you place it.
- 3. Test Your Map: Publish your changes and load the page. The map should appear centered on your chosen location with a marker. Check your browser’s console (F12 > Console) for any errors if it doesn’t load.
The Hidden Complexities of the DIY Method
While the custom API method is powerful, it comes with significant challenges for the average website owner:
- Technical Overhead: Managing Google Cloud projects, billing, and API security is not a trivial task.
- Security Risks: An incorrectly configured API key can lead to unauthorized use and surprising costs.
- Time-Consuming: Writing, testing, and debugging code takes valuable time away from running your business.
- Limited Flexibility: Making simple design changes, like adding a second location or changing the marker icon, requires going back into the code.
Get a Professional Map in Minutes, Not Hours with MapsFun.com
Why navigate the maze of API keys and code when you can achieve a better result instantly?
MapsFun.com is the ultimate tool for adding beautiful, customized Google Maps to any website without a single line of code.
- 1. Zero Coding: Use a simple visual editor to design your perfect map.
- 2. No API Setup: We handle all the complex backend setup and security for you.
- 3. Rich Features: Easily add multiple locations, contact forms, custom styling, and branded markers in a few clicks.
- 4. Instant Embed Code: Get a ready-to-use code snippet that works on any platform—WordPress, Wix, Squarespace, or any custom site.
Stop wrestling with complex configurations. Create and embed a stunning, fully-functional Google Map in just a few clicks at MapsFun.com.