The Complete Guide to Adding Interactive Maps in Webflow
Navigate This Guide
This is your definitive resource for integrating dynamic, visually stunning maps into your Webflow projects. Whether you’re a freelance designer, a studio building for clients, or a business owner, this guide will walk you through every viable method—from native embeds to advanced CMS-driven solutions. Discover how to balance Webflow’s visual design power with robust mapping functionality for any use case.
Mapping Your Webflow Toolkit: A Strategic Overview
Webflow’s unique blend of visual design and custom code access creates multiple pathways for map integration. Your choice depends on your project’s complexity and your comfort with code:
– The Native Embed: Using Webflow’s Embed Element for simplicity.
– Custom Code Integration: Leveraging the HTML embed for Google Maps with light styling.
– The Advanced CMS + API Method: Building a dynamic, CMS-powered map with JavaScript.
– The Unified Platform Solution: Using a service like MapsFun.comto bridge the gap between design freedom and complex functionality.
Chapter 1: The Native Embed Element Method
What to Expect in This Section
Learn the quickest way to place a functional map on a Webflow page using the built-in Embed element. This approach is ideal for static contact pages or projects where a single, simple map is sufficient.
The Designer-Friendly Workflow
Webflow’s Embed element (`</>`) is the gateway for external content. For a basic map, you would navigate to Google Maps, find your location, and use the “Share” > “Embed a map” feature to copy an HTML iframe code. You then paste this code directly into an Embed element on your Webflow canvas.
This method requires zero JavaScript knowledge and takes minutes. The map is live in the Designer, allowing you to position it visually within your layout. You can use Webflow’s native styling tools (like width, margin, and border-radius) on the Embed element’s container to integrate it into your design.
The Webflow Embed element: a straightforward container for external map code.
Core Limitations for Designers
While fast, this method is fundamentally a static iframe. It severely limits creative control. You cannot custom-style the map tiles, change pin icons to match your brand, or create smooth interactive animations triggered by scroll or hover. More critically, it’s a fixed solution. Displaying multiple locations requires creating a separate custom map in Google My Maps first, and any updates force you to leave Webflow, modify the external map, and replace the embed code—breaking the streamlined visual workflow.
Chapter 2: Custom Code with Basic Styling
What to Expect in This Section
Explore a step beyond the basic embed by incorporating light custom code. This method aims for better visual integration by using Google Maps’ built-in styling parameters, all while staying within a code-focused approach.
Enhancing the Embed with Styling
Google Maps provides a Snazzy Maps-like interface to generate custom JSON style arrays. You can use these to modify the map’s appearance—making it monochrome, altering feature colors, or adjusting visibility. The generated style JSON is added as a parameter within the iframe’s `src` URL from the standard embed code.
In practice, this means you’re still using the Webflow Embed element, but with a more customized iframe src attribute. This allows the map to better complement your site’s color palette without writing functional JavaScript.
The Persistent Gap in Control and Dynamism
This approach only addresses basic aesthetics. The map remains a non-native iframe, creating a disconnect in user experience. Advanced interactions—like smooth zooming to a collection of CMS items, binding map marker clicks to Webflow’s Interactions, or creating a true store locator with search—are impossible. You are still managing locations outside of Webflow, and the solution is not dynamic. For projects where the map is central to the user journey, this method is a visual patch, not a integrated solution.
Chapter 3: The Advanced CMS + JavaScript API Method
What to Expect in This Section
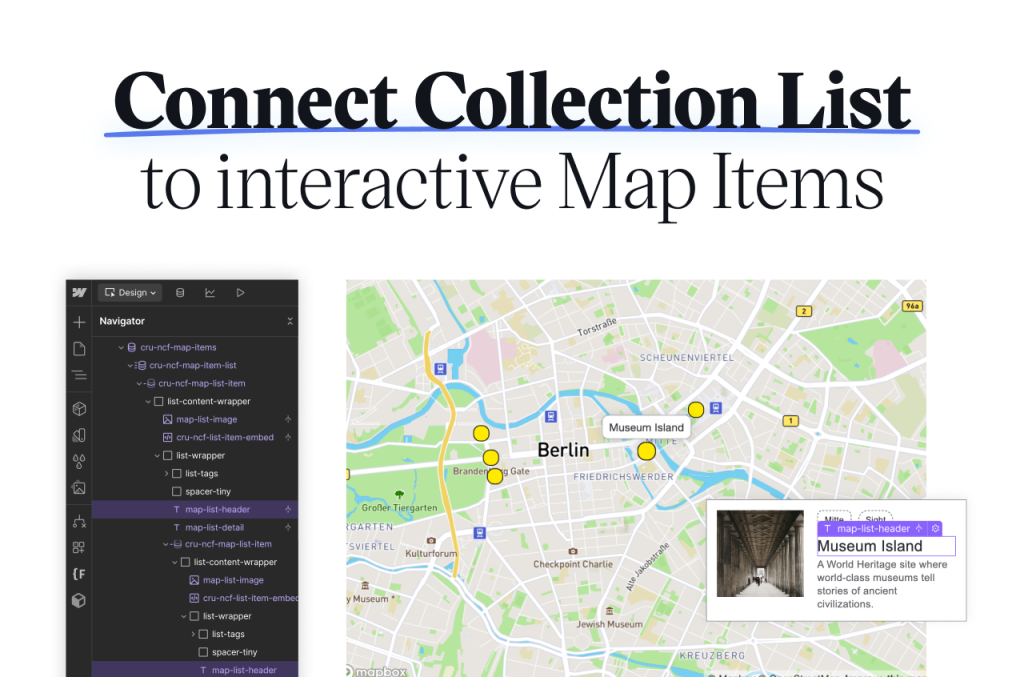
For projects requiring true dynamism, this section covers the pinnacle of custom integration: connecting a Webflow CMS collection to the Google Maps JavaScript API. This is the path for building features like interactive store locators or event maps.
The Power of a Dynamic, Data-Driven Map
This method unlocks the full potential of Webflow. You create a CMS collection (e.g., “Store Locations”) with fields for address, coordinates, and custom details. Through custom code added in the Project Settings or to a specific page, you use the Google Maps JavaScript API to fetch this CMS data (often via the Webflow API) and plot each item as an interactive marker on a map initialized in an Embed element.
The result is powerful: a single map where locations are managed entirely within the Webflow CMS. Update an address in the CMS, and the map updates automatically. You can create rich info windows populated with CMS content and even sync map interactions with other page elements.
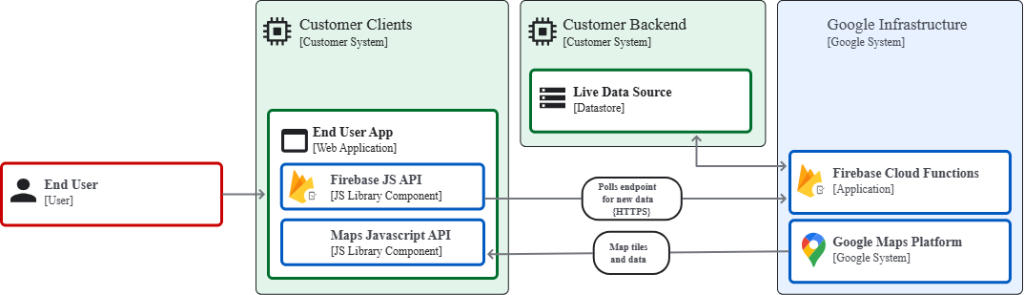
The advanced architecture: connecting Webflow CMS data to a custom JavaScript map
The Significant Development Hurdles
- This path, while powerful, comes with major barriers:
- 1. API Key & Billing Management: It requires a Google Cloud project with the Maps JavaScript API enabled, API key security setup, and an understanding of Google’s billing model.
- 2. Complex JavaScript Development: Writing robust code to handle geocoding (turning addresses into coordinates), marker clustering, and smooth interactions demands significant development expertise.
- 3. Performance Optimization: Inefficient code can bloat your site and increase hosting usage. The map’s performance becomes your responsibility.
- 4. Ongoing Maintenance: You own the codebase. Updates to the Webflow or Google Maps APIs, or desired new features, require continuous developer involvement.
For most designers and clients, this represents a high-cost, high-maintenance solution that turns a visual design task into a long-term development project.
The Universal Webflow Mapping Challenges
What to Expect in This Section
Regardless of the method chosen, Webflow designers and developers consistently face a set of core challenges that complicate map integration.
Pain Points Across the Board
- –The Design-Control Paradox: Webflow excels at pixel-perfect design, but maps often break this paradigm. Native embeds are visually limiting, while achieving custom design requires complex code, negating the visual editor’s benefit.
- –The Dynamic Data Dilemma: While Webflow’s CMS is perfect for managing location data, visually presenting that data on a map requires a difficult jump into custom API development.
- –The Workflow Disruption: The process frequently forces you to leave the Webflow Designer. You toggle between Google Cloud Console, code editors, and Webflow, breaking the seamless design-to-publish workflow.
- –Performance Responsibility: Optimizing map load times, implementing lazy loading, and ensuring mobile responsiveness with custom code falls on your team, adding to project complexity.
- –Client Management Complexity: Solutions involving API keys and custom code create handoff and maintenance challenges for client projects, leading to ongoing support burdens.
The Streamlined Solution: MapsFun for Webflow
After examining the spectrum of options—from restrictive embeds to high-maintenance custom code—a solution that aligns with Webflow’s core philosophy of visual development becomes essential.
MapsFun is built for this exact purpose. It acts as a powerful, visual extension of the Webflow workflow, eliminating code complexity while delivering enterprise-grade mapping features.
Why MapsFun is the Ideal Webflow Partner
MapsFun operates on a simple principle: design your map visually, then integrate it seamlessly. You use an intuitive, web-based editor to add unlimited locations, apply custom branding (colors, icons, fonts), and configure interactivity. Once designed, you deploy it to Webflow using a single, clean script placed in a Custom Code Embed or in the Project Settings.
This approach provides the deep customization and dynamism of the advanced CMS+API method but through a visual interface. You can even connect it to a Webflow CMS collection for true dynamic mapping without writing a single line of JavaScript or touching an API key.
How MapsFun Solves Webflow-Specific Challenges:
- Visual Design Parity: Achieve pixel-perfect styling that matches your Webflow site directly in a visual editor. No CSS wrestling.
- Dynamic CMS Integration: Connect directly to your Webflow CMS collections to create maps that update automatically, bridging the data gap without custom code.
- Unbroken Workflow: Design your map in a dedicated UI, then implement in Webflow with a copy-paste step. No context switching between platforms.
- Built-in Performance: MapsFun maps are optimized for speed and responsiveness out of the box, with lazy loading and efficient scripts.
- Client-Friendly Handoff: You deliver a professional map to clients where they manage locations via a simple dashboard or their own Webflow CMS—with no API key or code maintenance for them.
From Compromise to Cohesion: A Direct Comparison
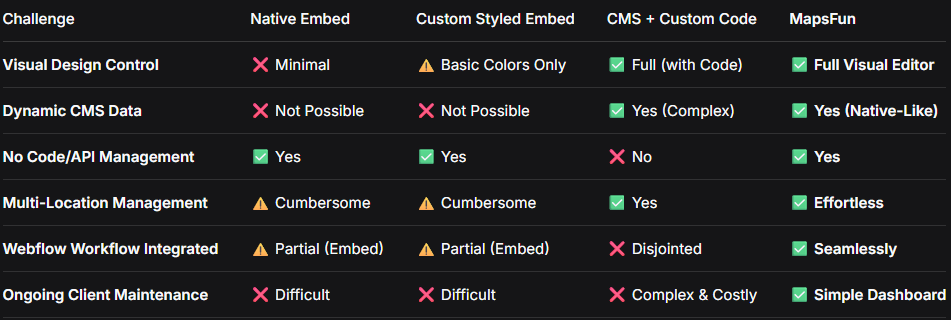
Your Path to a Perfectly Integrated Map
Webflow empowers you to build visually sophisticated, production-ready websites without traditional coding constraints. Your mapping solution should empower you in the same way, not force you back into a developer-centric toolchain.
MapsFun.com is that enabling solution. It provides the advanced, dynamic capabilities of a custom-coded map through a visual, designer-friendly interface that complements the Webflow experience. It turns map integration from a technical hurdle into a straightforward design task.
Stop compromising between visual design and functional requirements. Visit MapsFun.com to discover how you can add stunning, dynamic, and perfectly integrated interactive maps to your Webflow projects—maintaining creative control from start to finish.