How to Add Google Maps to Joomla 4
How to Add Google Maps with Multiple Locations to Your Joomla 4 Website (Complete Guide)
Adding an interactive map with multiple locations to your Joomla 4 site can enhance user experience for businesses with multiple branches, event organizers, or travel websites. While Joomla offers extensions for this purpose, the setup process involves several technical steps. This guide covers both extension-based and manual coding approaches.
Method 1: Using Joomla Extensions (The Most Common Approach)
Step 1: Choosing and Installing a Maps Extension
Joomla has several map extensions, but many are outdated or not compatible with Joomla 4. Here are the current options:
- 1. Log in to your Joomla 4 Administrator panel
- 2. Navigate to System → Install → Extensions
- 3. Search for map extensions. Popular options include:
- – Google Maps v3 (by NoNumber) – Simple but limited
- – Maply – More advanced features
- – GMapFP – For multiple locations
Step 2: Configuring Google Maps API Key (Critical Step)
This is where most users get stuck. Since June 2018, all Google Maps implementations require an API key with billing enabled.
- 1. Create a Google Cloud Project:
- – Go to [Google Cloud Console](https://console.cloud.google.com/)
- – Create a new project
- – Enable billing (yes, credit card required, but you get $200 monthly credit)
- 2. Enable Required APIs:
- – Maps JavaScript API
- – Geocoding API (for address conversion)
- 3. Create and Restrict API Key:
- javascript
// Example of restricted API key settings
// Restrict to your domain only for security
HTTP referrers: yourdomain.com/*
APIs: Maps JavaScript API, Geocoding APICode language: JavaScript (javascript)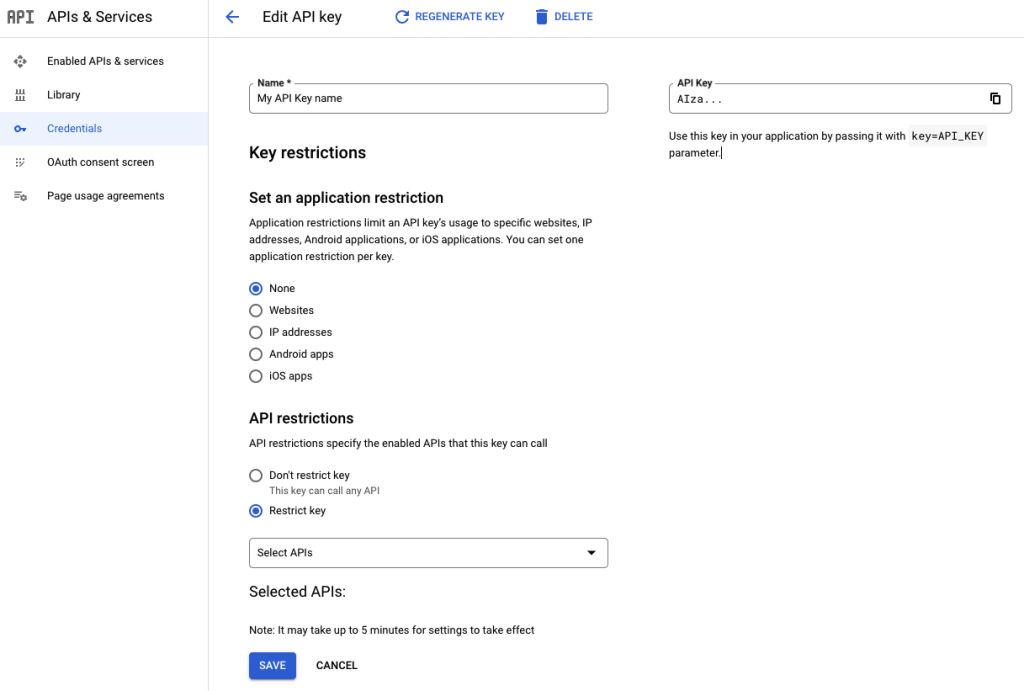
Step 3: Configuring Your Chosen Extension
Let’s use Google Maps v3 (by NoNumber) as an example
- 1. Install and enable the plugin
- 2. Go to Plugins → Search for “Google Maps”
- 3. Enter your API key in the plugin parameters:
- 4. Syntax for adding multiple locations in an article:
- html
{googlemaps width=100% height=400 zoom=12}
Address 1: Your first location details|Marker Title 1
Address 2: Your second location details|Marker Title 2
Address 3: Your third location details|Marker Title 3
{/googlemaps}
Step 4: Limitations of Joomla Map Extensions
Despite their convenience, Joomla map extensions often suffer from:
- 1. Outdated Code: Many haven’t been updated for Joomla 4
- 2. Limited Customization: Fixed marker styles, limited controls
- 3. Performance Issues: Can slow down page loading
- 4. Mobile Responsiveness Problems: Don’t always adapt well to different screens
- 5. Complex Updates: Changing locations often requires editing article code
Method 2: Manual Implementation with Custom Module
For more control, you can create a custom module with your own HTML/JavaScript.
Step 1: Create a Custom HTML Module
- 1. Go to Content → Site Modules → New
- 2. Select Custom as the module type
- 3. Set your module position and assignment
Step 2: Add the HTML/JavaScript Code
In the module editor, switch to the HTML view and add:
html
<div id="map-container-joomla" style="width: 100%; height: 500px;"></div>

<script>
// Wait for the document and Google Maps to load
function initMap() {
    // Define locations array
    const locations = [
        {lat: 40.7128, lng: -74.0060, title: "New York Office"},
        {lat: 34.0522, lng: -118.2437, title: "LA Branch"},
        {lat: 41.8781, lng: -87.6298, title: "Chicago Warehouse"}
    ];

    // Create map centered on first location
    const map = new google.maps.Map(document.getElementById('map-container-joomla'), {
        zoom: 4,
        center: locations[0]
    });

    // Add markers for each location
    locations.forEach(location => {
        new google.maps.Marker({
            position: location,
            map: map,
            title: location.title
        });
    });
}
</script>

<!-- Load Google Maps with YOUR_API_KEY -->
<script async defer
    src="https://maps.googleapis.com/maps/api/js?key=YOUR_API_KEY_HERE&callback=initMap">
</script>
Code language: HTML, XML (xml)
Step 3: Addressing Common Issues
- Problem: Map doesn’t load or shows API error
- Solution: Check your API key restrictions and ensure billing is enabled
- Problem: Map breaks Joomla template
- Solution: Add CSS to module:
- css
- Solution: Add CSS to module:
#map-container-joomla img { max-width: none !important; }
.gm-style { font-family: inherit !important; }Code language: CSS (css)- Problem: Map doesn’t appear on mobile
- Solution: Add responsive CSS:
- css
@media (max-width: 768px) {
    #map-container-joomla { height: 300px !important; }
}
Code language: CSS (css)
The Technical Challenges of Joomla 4 Google Maps Integration
⚠️ Common Pain Points Users Experience:
- 1. API Key Management: Constantly worrying about quota limits and billing
- 2. Extension Compatibility: Finding extensions that work with Joomla 4
- 3. Template Conflicts: Maps breaking responsive design
- 4. Performance Impact: Slow page loading times
- 5. Maintenance Overhead: Regular updates needed for both Joomla and extensions
- 6. Mobile Optimization: Additional CSS/JS required for proper mobile display
The Simplified Alternative: MapsFun.com for Joomla
What if you could skip all the technical setup and get a professional, feature-rich map working on your Joomla 4 site in minutes?
Why MapsFun.com Works Perfectly with Joomla 4
- 1. No API Key Hassle: We handle all the backend Google Maps integration
- 2. Joomla-Compatible Embed: Simple iframe code works in any custom module
- 3. Automatic Updates: When you edit your map on MapsFun, changes appear instantly on your Joomla site
3-Step Joomla 4 Integration with MapsFun:
- Step 1: Create your multi-location map on [MapsFun.com](https://mapsfun.com)
- 1. Add locations via search or import
- 2. Customize colors, markers, and info windows
- Step 2: Copy your embed code from MapsFun
- Step 3: In Joomla:
- 1. Create a Custom module
- 2. Paste the MapsFun embed code
- 3. Publish to your desired position
html
<!-- Example MapsFun embed code for Joomla -->
<div class="mapsfun-embed" style="width:100%;height:500px;">
    <iframe src="https://mapsfun.com/embed/YOUR_MAP_ID"
            style="border:none;width:100%;height:100%;"
            frameborder="0">
    </iframe>
</div>
Code language: HTML, XML (xml)
Benefits Over Traditional Joomla Methods:
- ✅ No Coding Required – Visual editor instead of complex configuration
- ✅ No Google Cloud Account Needed – Skip the API key bureaucracy
- ✅ Perfect Responsive Design – Works flawlessly on all devices
- ✅ Easy Content Updates – Edit locations without touching Joomla backend
- ✅ Professional Features – Custom markers, clustering, directions, and more
- ✅ Better Performance – Optimized loading that won’t slow down your Joomla site
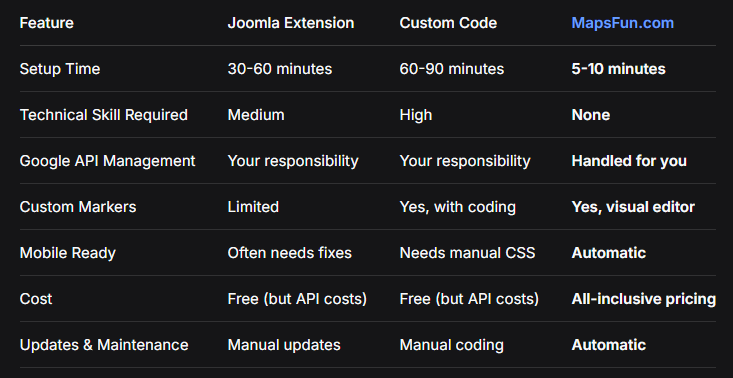
Comparison: Joomla Map Solutions
Conclusion: Streamline Your Joomla 4 Mapping
While Joomla 4 offers pathways to integrate Google Maps through extensions or custom coding, the process is fraught with technical complexity—from managing Google Cloud projects and API keys to resolving extension conflicts and ensuring mobile responsiveness.
For Joomla administrators who want professional mapping without the technical headache,** MapsFun.com provides a streamlined solution. Instead of navigating API consoles, debugging extension conflicts, or writing custom JavaScript, you can create beautiful, functional multi-location maps through an intuitive visual interface and embed them in Joomla with simple copy-paste.
Stop wrestling with technical configurations and start displaying beautiful maps on your Joomla 4 site today. Visit MapsFun.com to create your first map in minutes—no coding, no API keys, and no complex Joomla extensions required.