How to Embed Google Maps in Joomla
How to Add Google Maps to Your Joomla Website: Multiple Locations Guide
Adding an interactive Google Map to your Joomla website seems straightforward until you need multiple location pins. While Joomla offers several approaches, each comes with technical challenges that can frustrate website owners. This comprehensive guide walks you through the working methods and introduces a simpler alternative.
Understanding the Google Maps API Requirement
Before you begin, know this critical fact: All Google Maps implementations now require an API key with billing enabled. Google provides $200 monthly credit (enough for most websites), but you must register a credit card.

Method 1: Using Joomla Extensions (The Plugin Approach)
Step 1: Find and Install a Compatible Extension
Not all map extensions work with modern Joomla versions. Here’s how to find working ones:
- 1. Log into Joomla Administrator
- 2. Navigate to Extensions → Manage → Install
- 3. Search for “Google Maps” in the Joomla Extensions Directory
Recommended extensions for Joomla 3.x/4.x:
- – Google Maps v3 by NoNumber (Simple but functional)
- – Maply (Advanced features, regular updates)
- – GMapFP (Good for multiple locations)

Step 2: Configure Your Google Maps API Key
This is where most users encounter problems. Follow these exact steps:
- 1. Create a Google Cloud Project:
- – console.cloud.google.com → New Project → Create
- 2. Enable Required APIs:
- – Maps JavaScript API
- – Geocoding API (for address lookup)
- – Places API (if searching locations)
- 3. Create Credentials:
- javascript
// Your API key will look like this:
   // AIzaSyB_7QkR3pL9mE6s4Xv8wJzT5nMpQrStUvW
Code language: PHP (php)- 4. Restrict Your API Key (CRUCIAL):
- – HTTP referrers: `*.yourdomain.com/*`
- – Enable only: Maps JavaScript API, Geocoding API
Step 3: Configure Your Chosen Extension
Using Google Maps v3 plugin as an example:
- 1. Activate the plugin: Extensions → Plugins → Search “maps”
- 2. Enter API key in plugin parameters
- 3. Add map to articles using plugin syntax:
html
{googlemaps width=100% height=400 zoom=12 marker=1}
Main Office: 123 Business St, City|Our Headquarters
Branch 1: 456 Commerce Ave, City|Downtown Location
Branch 2: 789 Trade Blvd, City|Westside Office
{/googlemaps}
Step 4: Alternative Extension – Using a Module
Some extensions work as modules instead:
- 1. Install a map module (like Map Module for Joomla)
- 2. Add module to a position through Module Manager
- 3. Configure multiple locations through backend interface:
Method 2: Manual HTML/JavaScript Integration
For complete control, add Google Maps directly to your Joomla template or articles.
Step 1: Create a Custom Module
- 1. Go to Extensions → Modules → New
- 2. Select Custom module type
- 3. Add this code in the editor:
html
<div class="google-map-container"
     style="width: 100%; height: 500px; margin: 20px 0;"
     id="custom-joomla-map">
</div>

<script>
// Wait for DOM and Google Maps to load
document.addEventListener('DOMContentLoaded', function() {
    function loadGoogleMaps() {
        const script = document.createElement('script');
        script.src = 'https://maps.googleapis.com/maps/api/js?key=YOUR_API_KEY&callback=initMap';
        script.async = true;
        document.head.appendChild(script);
    }

    window.initMap = function() {
        const locations = [
            {lat: 51.5074, lng: -0.1278, title: "London Office"},
            {lat: 48.8566, lng: 2.3522, title: "Paris Branch"},
            {lat: 52.5200, lng: 13.4050, title: "Berlin Location"}
        ];

        const map = new google.maps.Map(document.getElementById('custom-joomla-map'), {
            zoom: 5,
            center: locations[0],
            styles: [
                // Custom map styling can go here
            ]
        });

        // Add markers with info windows
        locations.forEach(location => {
            const marker = new google.maps.Marker({
                position: location,
                map: map,
                title: location.title
            });

            const infowindow = new google.maps.InfoWindow({
                content: `<h3>${location.title}</h3><p>More details here</p>`
            });

            marker.addListener('click', () => {
                infowindow.open(map, marker);
            });
        });
    };

    loadGoogleMaps();
});
</script>

<style>
/* Ensure map responsiveness */
.google-map-container img { max-width: none !important; }
@media (max-width: 768px) {
    .google-map-container { height: 300px !important; }
}
</style>
Code language: HTML, XML (xml)
Step 2: Template Override for Site-Wide Maps
For maps on every page, add to your template:
- 1. Edit template files: `/templates/your-template/index.php`
- 2. Add API script in head section:
php
<?php if ($this->countModules('map-position')) : ?>
<script src="https://maps.googleapis.com/maps/api/js?key=YOUR_API_KEY" async defer></script>
<?php endif; ?>
Code language: HTML, XML (xml)
3. Create module position in template Details.xml:
xml
<position>map-position</position>Code language: HTML, XML (xml)Common Problems & Solutions
- ❌ Problem 1: “Oops! Something went wrong” Error
- Solution: This means your API key isn’t configured correctly. Check:
- – Billing is enabled on Google Cloud
- – API key restrictions match your domain
- – Correct APIs are enabled
- ❌ Problem 2: Map Doesn’t Show in Article
- Solution: Ensure the plugin is published and enabled for your content type.
- ❌ Problem 3: Mobile Display Issues
- Solution: Add responsive CSS to your template:
- css
.gm-style img { max-width: none !important; }
.gm-style .gm-style-iw-c { padding: 0 !important; }Code language: CSS (css)- ❌ Problem 4: Multiple Extensions Conflict
- Solution: Disable other map extensions. Joomla can only load Google Maps API once per page.
Performance Optimization Tips
- 1. Lazy Load Maps: Only load maps when visible
- javascript
// Add to your script
if ('IntersectionObserver' in window) {
    const observer = new IntersectionObserver((entries) => {
        entries.forEach(entry => {
            if (entry.isIntersecting) {
                loadMap();
                observer.unobserve(entry.target);
            }
        });
    });
    observer.observe(document.getElementById('map-container'));
}
Code language: JavaScript (javascript)- 2. Cache API Calls: Use Joomla caching plugins
- 3. Minimize Markers: Cluster markers when displaying many locations
- 4. Optimize Images: Custom marker images should be optimized
The Technical Overhead: Why Joomla + Google Maps Is Complex
Consider what you’re managing with traditional approaches:
- 1. API Key Management: Constant monitoring of usage and quotas
- 2. Extension Updates: Regular compatibility checks
- 3. Security Concerns: Proper API key restriction
- 4. Performance Tuning: CSS/JS optimization
- 5. Mobile Testing: Ensuring compatibility across devices
- 6. Browser Compatibility: Different rendering issues
The Simplified Solution: MapsFun.com for Joomla
What if you could achieve better results without the technical complexity? MapsFun.com eliminates every pain point mentioned above.
How MapsFun.com Works with Joomla:
- 1. No API Key Management: We handle all Google Maps integration
- 2. Simple Embed Code: Works in any Joomla custom module
- 3. Visual Editor: Create maps without writing code
3-Minute Joomla Integration:
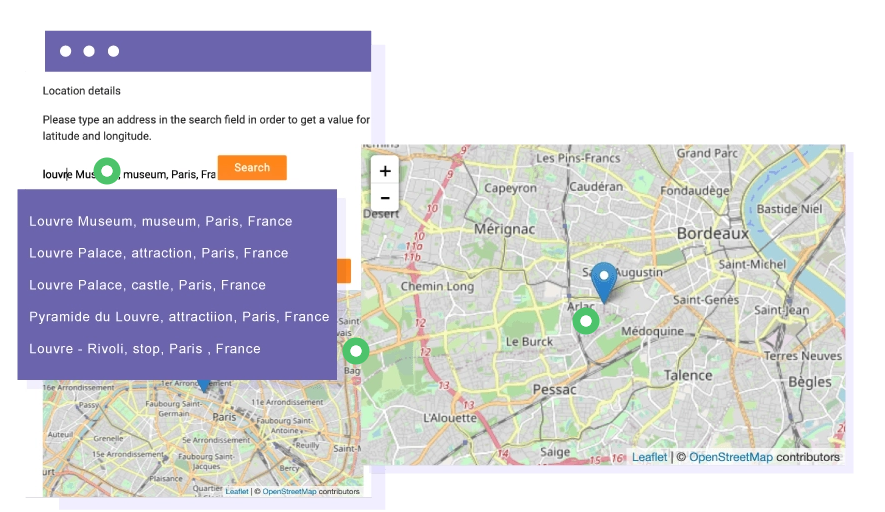
- Step 1: Create your map at [MapsFun.com](https://mapsfun.com)
- – Add locations via search or spreadsheet import
- – Customize colors to match your Joomla template
- – Add custom markers and info windows
- Step 2: Copy your embed code
- Step 3: In Joomla:
- 1. Create Custom Module
- 2. Paste MapsFun code
- 3. Publish to any module position
html
<!-- MapsFun Joomla Embed Example -->
<div style="width:100%;height:500px;">
    <iframe src="https://app.mapsfun.com/embed/map/YOUR_MAP_ID"
            style="border:none;width:100%;height:100%;"
            title="Our Locations">
    </iframe>
</div>Code language: HTML, XML (xml)
Why Joomla Users Prefer MapsFun.com:
- ✅ No Technical Setup – Skip API keys and Google Cloud
- ✅ Perfect Joomla Integration – Works with any template
- ✅ Professional Results – Better than most free extensions
- ✅ Automatic Updates – Edit once, update everywhere
- ✅ Cost Predictable – No surprise Google API bills
- ✅ Support Included – Get help when you need it
Feature Comparison: Joomla Mapping Solutions
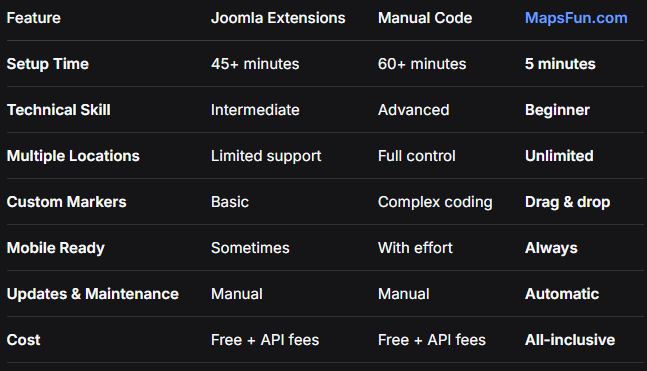
Conclusion: Choose Your Mapping Strategy Wisely
While Joomla provides pathways to integrate Google Maps—through extensions requiring careful configuration or custom coding demanding technical expertise—these approaches come with significant complexity. You’re not just adding a map; you’re becoming an API key manager, extension troubleshooter, and performance optimizer.
For Joomla website owners who want professional mapping without becoming technical experts,MapsFun.com offers a compelling alternative. Instead of navigating Google Cloud Console, debugging plugin conflicts, or writing custom JavaScript, you can create beautiful, interactive maps through an intuitive visual interface.
Skip the complexity and get better results. Whether you’re displaying store locations, event venues, or service areas, MapsFun.com delivers professional Google Maps integration for your Joomla site without the technical headache. Visit MapsFun.com to create your first map in minutes—no coding, no API keys, and no extension conflicts required.