How to Add Multiple Pins Map to Squarespace
How to Add a Map with Multiple Pins to Your Squarespace Site (The Ultimate Guide)
Displaying multiple locations on your Squarespace website – whether it’s store locations, event venues, or project sites – is a common need for businesses. However, Squarespace’s built-in map block has a significant limitation: it only supports one location pin by default. This guide will show you the workaround to add multiple pins and why a specialized tool might be your best solution.
The Challenge with Squarespace’s Native Map Block
Let’s first understand the limitation. When you add a standard Map Block in Squarespace, here’s what happens:
- 1. Go to your page editor
- 2. Click “Add Block” (+ icon)
- 3. Search for “Map”
- 4. You’ll see this interface:
As you can see, there’s only one address field. This means you can only display a single pin. If you try to add multiple addresses separated by commas or line breaks, it simply won’t work correctly.
Method 1: The Code Workaround (Manual HTML/JavaScript)
This is the technical solution that requires custom coding. It involves creating a map externally and embedding it using a Code Block.
Step 1: Create Your Multi-Pin Map on Google Maps
First, you need to create a custom map outside of Squarespace:
- 1. Go to [Google My Maps](https://www.google.com/maps/d/)
- 2. Sign in with your Google account
- 3. Click “Create a New Map”
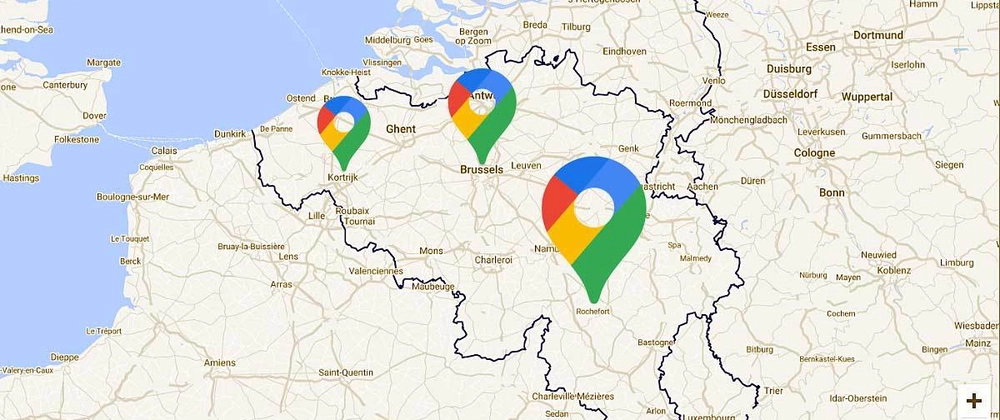
- 4. Add your multiple locations using the search bar or manual pin placement:
- 5. Click “Share” and set the map to “Public”
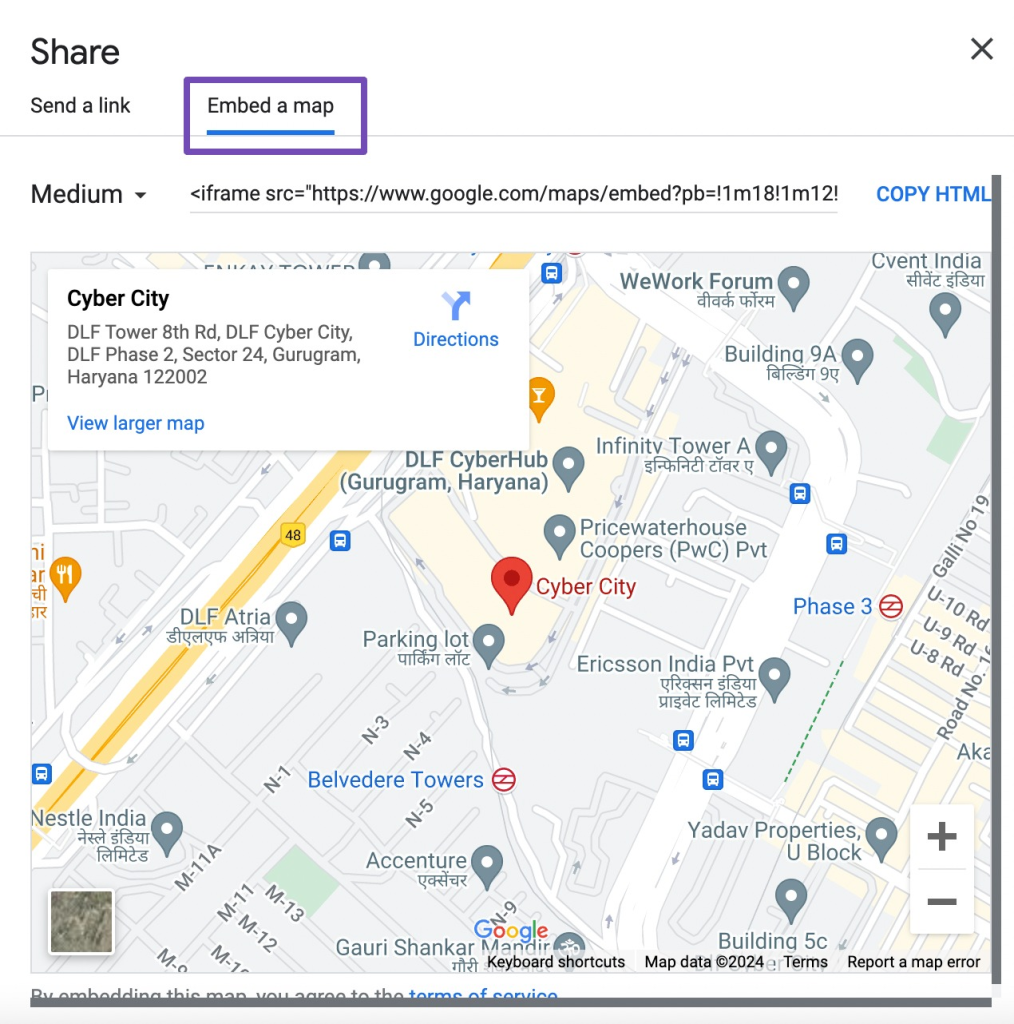
- 6. Click the three-dot menu → “Embed on my site”
- 7. Copy the iframe code:
html
<iframe
  src="https://www.google.com/maps/d/embed?mid=YOUR_MAP_ID&ehbc=2E312F"
  width="640"
  height="480">
</iframe>Code language: HTML, XML (xml)
Step 2: Embed the Map in Squarespace
- 1. In your Squarespace editor, add a Code Block where you want the map to appear
- 2. Paste the iframe code
- 3. Customize the width and height (use `100%` for responsive width):
html<div class="map-container">
<iframe
src="https://www.google.com/maps/d/embed?mid=1YOUR_MAP_ID_HERE&ehbc=2E312F"
width="100%"
height="500"
style="border:0;"
allowfullscreen=""
loading="lazy">
</iframe>
</div>
Code language: HTML, XML (xml)Step 3: Add CSS for Responsive Design (Optional but Recommended)
Add this CSS in **Design → Custom CSS** to ensure your map is responsive:
css
/* Make embedded maps responsive */
.map-container {
  position: relative;
  overflow: hidden;
  padding-top: 56.25%; /* 16:9 Aspect Ratio */
}

.map-container iframe {
  position: absolute;
  top: 0;
  left: 0;
  width: 100%;
  height: 100%;
}
Code language: CSS (css)
The Problems with This Manual Method
While this workaround functions, it comes with several challenges:
❌ Limitations You’ll Encounter:
- 1. Clunky User Experience: Google My Maps isn’t designed for seamless website integration
- 2. Limited Customization: Difficult to match your Squarespace site’s branding
- 3. Mobile Responsiveness Issues: Requires additional CSS tweaking
- 4. No Direct Editing: To update locations, you must go back to Google My Maps, update, then re-embed
- 5. Ugly Default Styling: Google My Maps embeds have a dated look that rarely matches modern Squarespace designs
Comparison showing ugly Google My Maps embed vs. clean custom map
- 6. Slower Load Times: Iframe embeds can impact your site’s performance score
Method 2: The Professional Solution – Use MapsFun.com
What if you could have a beautiful, fully customizable multi-pin map that integrates seamlessly with Squarespace – without any coding?
Why MapsFun.com is the Perfect Squarespace Solution
- 1. Squarespace-Native Look: Create maps that perfectly match your site’s aesthetic
- 2. No Coding Required: Visual editor lets you add pins with clicks, not code
- 3. Direct Squarespace Integration: Copy-paste simple embed code just like Method 1, but with better results
How to Use MapsFun with Squarespace (2-Minute Setup):
- 1. Create Your Map:
- – Go to [MapsFun.com](https://mapsfun.com)
- – Click “Create New Map”
- – Add locations via search or CSV upload
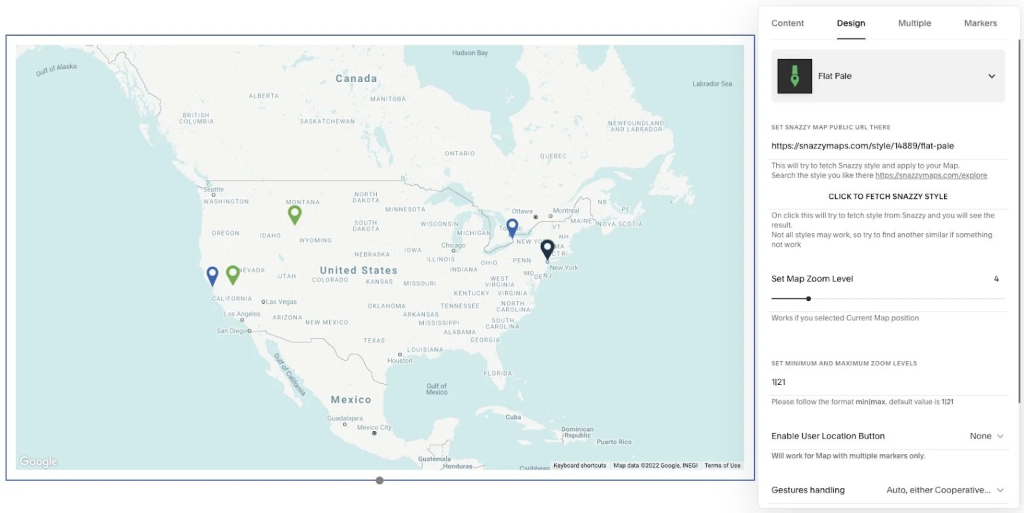
- – Customize pins, colors, and styles
- 2. Get Your Embed Code:
- – Click “Publish”
- – Copy the clean, optimized embed code
- 3. Add to Squarespace:
- – Add a Code Block to your page
- – Paste the MapsFun code
- – Done!
Benefits Over the Manual Method:
- ✅ Brand-Aligned Design: Match your Squarespace color scheme exactly
- ✅ Faster Loading: Optimized code that won’t slow down your site
- ✅ Easy Updates: Edit locations directly without re-embedding
- ✅ Mobile-Perfect: Automatically responsive on all devices
- ✅ Better UX: Clean interface that doesn’t look like a Google embed
- ✅ Advanced Features: Add custom icons, interactive info windows, and directions
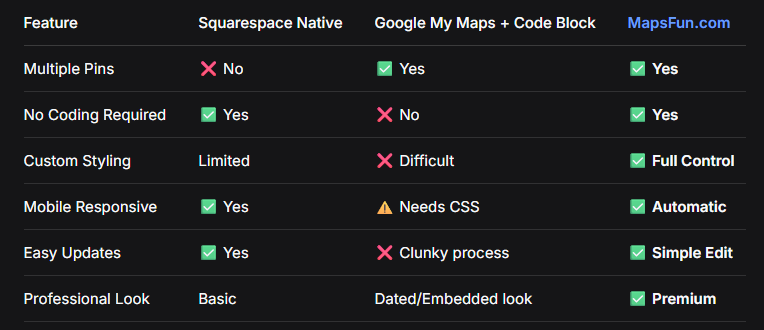
Quick Comparison: Which Method Should You Choose?
Conclusion: Skip the Hassle, Use the Right Tool
While it’s technically possible to hack together a multi-pin map for Squarespace using Google My Maps and code blocks, the result is often clunky, slow, and doesn’t match your site’s professional design.
The simpler, better-looking alternative? Use a tool built specifically for this purpose.
MapsFun.com eliminates all the technical hurdles of the manual method. Instead of wrestling with iframe codes, CSS fixes, and Google My Maps’ limited interface, you get:
- 1. A visual editor that lets you create stunning maps in minutes
- 2. One-click embedding into your Squarespace site
- 3. Professional results that enhance – rather than detract from – your website’s design
Don’t compromise on your site’s aesthetics or user experience with workaround solutions. Create a beautiful, functional multi-location map that truly represents your brand in just a few minutes at MapsFun.com. Perfect for Squarespace users who want professional results without the technical headache.