How to Embed Google Maps on Website Using iFrame
How to Add a Google Maps Widget to Your Website: A Developer’s Guide
A Google Maps widget is essential for any business with a physical location. It helps customers find you easily, increasing trust and foot traffic. While adding a simple map might seem straightforward, creating a custom, responsive widget that matches your site’s design requires some technical work.
This guide will walk you through the process of creating and embedding a custom Google Maps widget using the official Google Maps Platform.
This method requires a Google Cloud account, enabling APIs, and basic knowledge of HTML, CSS, and JavaScript.
Method 1: The Custom Google Maps API Method
Step 1: Google Cloud Project & API Setup
- 1. Go to the Google Cloud Console: Navigate to the [Google Cloud Console].
- 2. Create a Project: Click on the project dropdown and create a new project or select an existing one.
- 3. Enable Billing: You must enable billing on your project. Don’t worry—Google offers a $200 monthly credit, which typically covers significant usage for a standard website map.
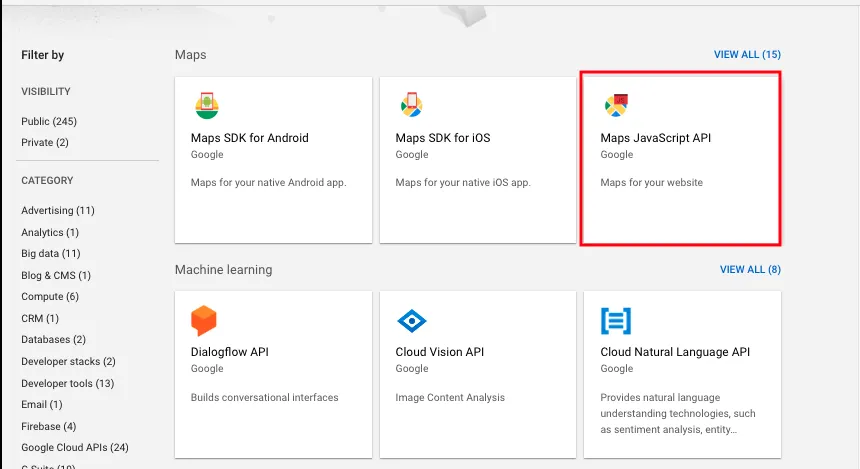
- 4. Enable the Maps JavaScript API: Go to “APIs & Services” > “Library”. Search for “Maps JavaScript API” and click “Enable”.
[Google Cloud Console API Library] Enable the Maps JavaScript API in your Google Cloud project
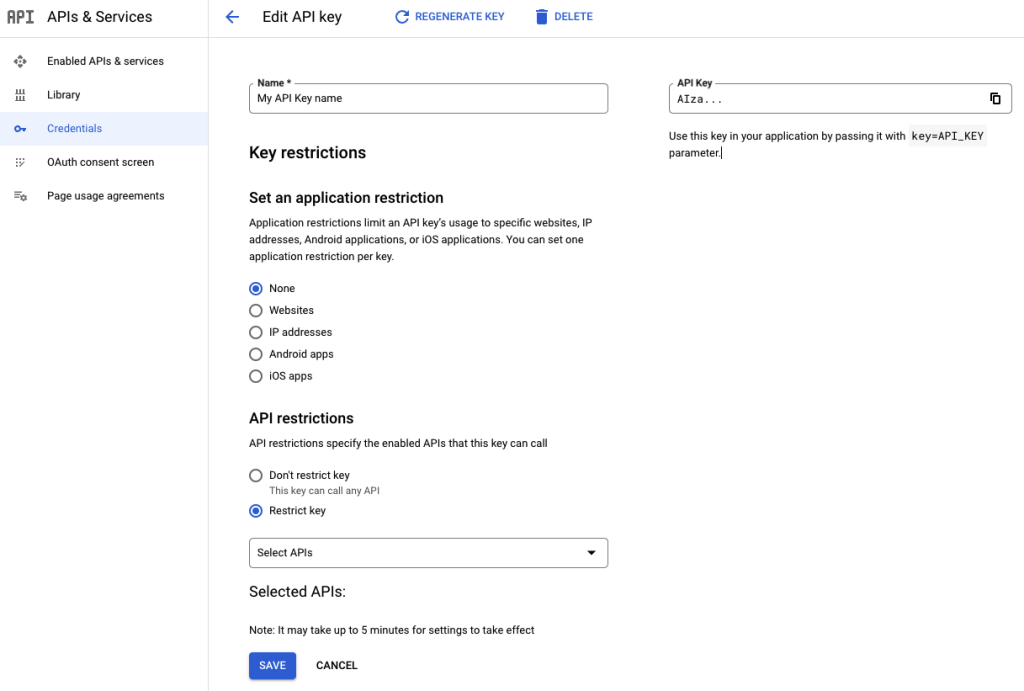
- 5. Create an API Key: Go to “APIs & Services” > “Credentials”. Click “Create Credentials” and choose “API key”.
- 6. Restrict Your API Key (CRITICAL): Click on the created key and set restrictions. Restrict it to the “Maps JavaScript API” and add your website domain (e.g., `*.yourdomain.com/*`) under “HTTP referrers” to prevent unauthorized use.
[API Key restriction settings] Always restrict your API key for security
Step 2: Build the Custom Widget Code
This code creates a responsive map widget centered on your location with a custom marker and info window.
Create an HTML file (e.g., `map-widget.html`) and add the following code:
<!DOCTYPE html>
<html>
<head>
    <title>Our Location</title>
    <!-- Include the Google Maps JS API with your key -->
    <script async defer src="https://maps.googleapis.com/maps/api/js?key=YOUR_API_KEY&callback=initMap"></script>
    <style>
        /* Widget Container Styling */
        .map-widget {
            width: 100%;
            max-width: 600px; /* Adjust as needed */
            height: 400px;
            border: none;
            border-radius: 8px; /* Rounded corners */
            box-shadow: 0 2px 10px rgba(0,0,0,0.1); /* Subtle shadow */
            margin: 20px auto;
        }
        #map {
            height: 100%;
            width: 100%;
            border-radius: 8px;
        }
    </style>
</head>
<body>
    <!-- The Map Widget Container -->
    <div class="map-widget">
        <div id="map"></div>
    </div>

    <script>
        function initMap() {
            // Define your business coordinates (e.g., London)
            const myLocation = { lat: 51.5074, lng: -0.1278 };

            // Create a map centered at your location
            const map = new google.maps.Map(document.getElementById("map"), {
                zoom: 15,
                center: myLocation,
                mapTypeControl: false, // Cleaner look
                streetViewControl: true,
                fullscreenControl: true,
            });

            // Create a custom marker
            const marker = new google.maps.Marker({
                position: myLocation,
                map: map,
                title: "Our Main Office", // Tooltip
                // icon: 'path/to/custom-icon.png' // Uncomment for custom icon
            });

            // Create an info window
            const infowindow = new google.maps.InfoWindow({
                content: `
                    <div style="padding: 10px;">
                        <h3 style="margin: 0 0 8px 0;">Our Office</h3>
                        <p style="margin: 0;">123 Business Street<br>London, UK</p>
                        <a href="https://maps.google.com/?q=51.5074,-0.1278" target="_blank">Get Directions</a>
                    </div>
                `
            });

            // Open info window on marker click
            marker.addListener("click", () => {
                infowindow.open(map, marker);
            });

            // Optional: Open info window automatically
            // infowindow.open(map, marker);
        }
    </script>
</body>
</html>

Code language: HTML, XML (xml)
Replace `YOUR_API_KEY` in the script tag with the restricted API key you created in Step 1.
Step 3: Embed the Widget on Your Website
- 1. For Static HTML Sites: Simply upload the `map-widget.html` file to your server and link to it or embed the code directly into your page.
- 2. For CMS like WordPress: Use a “Custom HTML” block or a code snippet plugin. Paste the entire code block into the widget area.
- 3. Test Thoroughly: Ensure the map loads correctly and the API key restrictions are working by checking the browser’s console for errors.
The Challenges of This Method
While powerful, the custom API approach has significant drawbacks:
- Technical Complexity: Requires managing Google Cloud projects, billing, and API keys.
- Security Risks: An unrestricted API key can lead to massive unauthorized charges.
- Development Time: Writing, testing, and debugging code takes considerable effort.
- Limited Flexibility: Making design changes requires rewriting and redeploying code.
Create Beautiful Maps in Minutes, Not Hours with MapsFun.com
Why spend hours on complex setup when you can achieve professional results in minutes?
MapsFun.com is the ultimate solution for adding stunning, customized Google Maps widgets to your website without any coding.
- No Code Required: Intuitive visual editor—just point and click to customize your map.
- No API Setup: We handle all the technical backend complexity for you.
- Advanced Features: Easily add multiple locations, custom markers, contact forms, and style your map to match your brand perfectly.
- Instant Embedding: Get a clean, responsive embed code ready to paste into any website builder or CMS.
Stop wrestling with code and API configurations. Create a perfect, professional map widget in just a few clicks at MapsFun.com.