How to Create a Map with Multiple Locations Free (2025 Guide)
How to Create a Map with Multiple Locations for Your Website
Displaying multiple locations on a map—whether for your store network, event venues, or service areas—dramatically improves user experience. While Google Maps offers a powerful platform to build this, the process can be technical and time-consuming.
This guide will walk you through the manual, code-based method. It works, but be prepared to dive into APIs and HTML.
The Manual Method: Using the Google Maps JavaScript API
This approach gives you full control but requires a Google Cloud account and some coding.
Step 1: Set Up a Google Cloud Project & API Key
The Google Maps API is not free for commercial use, and it requires a project with billing enabled.
- 1. Go to the [Google Cloud Console](https://console.cloud.google.com/).
- 2. Create a new project.
- 3. Enable Billing: You must link a billing account. Google offers a $200 monthly credit, which is sufficient for most small to medium websites.
- 4. Enable the APIs: Navigate to “APIs & Services > Library” and enable these two:
- Maps JavaScript API
- Geocoding API (to convert addresses to coordinates)
- 5. Create an API Key: Go to “APIs & Services > Credentials”, click “Create Credentials,” and choose “API key.” Crucially, restrict this key to your website’s domain and the APIs you enabled to prevent unauthorized use.
Step 2: Build the Map with HTML and JavaScript
Create a new HTML file (e.g., `my-map.html`) and paste the following code. This code creates a map, defines an array of locations, and places a marker for each one.
html
<!DOCTYPE html>
<html>
<head>
<title>Our Store Locations</title>
<!-- Load the Maps API using your key -->
<script async defer src="https://maps.googleapis.com/maps/api/js?key=YOUR_API_KEY_HERE&callback=initMap"></script>
<style>
/* Set the size of the map div */
#map {
height: 500px;
width: 100%;
border-radius: 8px;
}
</style>
</head>
<body>
<h2>Find Us Here</h2>
<!-- The map will be inserted into this div -->
<div id="map"></div>
<script>
// The function that initializes the map
function initMap() {
// Define the initial center point of the map
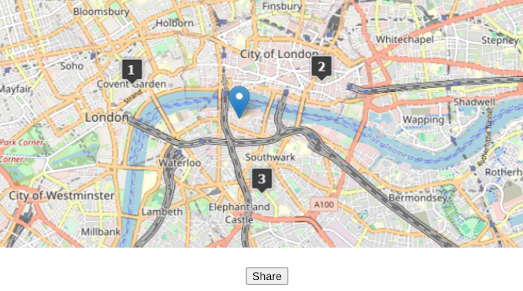
const mapCenter = { lat: 51.5074, lng: -0.1278 }; // London
// Create the map object
const map = new google.maps.Map(document.getElementById("map"), {
zoom: 10,
center: mapCenter,
});
// An array of your locations: [Title, Latitude, Longitude]
const locations = [
['London HQ', 51.5074, -0.1278],
['Westside Store', 51.5167, -0.2101],
['East End Warehouse', 51.5257, -0.0397]
];
// Create a single InfoWindow to reuse
const infowindow = new google.maps.InfoWindow();
// Loop through the locations and add markers
locations.forEach(([title, lat, lng]) => {
const marker = new google.maps.Marker({
position: { lat, lng },
map: map,
title: title, // Shows on hover
});
// Add a click listener to show the InfoWindow
marker.addListener("click", () => {
infowindow.setContent(`<strong>${title}</strong>`);
infowindow.open(map, marker);
});
});
}
</script>
</body>
</html>
Code language: HTML, XML (xml)Replace `YOUR_API_KEY_HERE` in the script tag with the actual API key you generated in Step 1.
Step 3: Embed the Map on Your Website
If your website is built with plain HTML, you can simply upload this file. For content management systems like WordPress, you will need to paste this code into a “Custom HTML” block or a dedicated code module.
The Challenge with the Manual Method
As you’ve seen, this process is fraught with complexity:
- Billing & Quotas: You must set up a Google Cloud account with billing, constantly worrying about usage quotas and potential costs.
- Security Risks: An unrestricted API key is a security vulnerability that can lead to massive bills.
- Technical Overhead: You need to manually find and input latitude/longitude for every address and write JavaScript code for any customizations.
- Maintenance: Any change to a location requires editing the code and re-uploading the file.
Create Stunning Maps in Minutes, Not Hours
What if you could achieve all this—and more—without writing a single line of code or touching the Google Cloud Console?
MapsFun.com is built specifically for this purpose. It’s a powerful tool that eliminates every single one of these pain points:
- Truly No-Code: Click to add locations from a search, customize colors and icons, and design info windows with a visual editor.
- No API Setup: We handle all the backend infrastructure. No accounts, billing, or security configurations are needed.
- Instant Embedding: Get a simple, secure embed code to paste into any website builder or CMS instantly.
Stop wrestling with complex APIs and fragile code. Create a beautiful, professional, and fully functional multi-location map in just a few clicks at MapsFun.com .