How to Map to Show Multiple Locations (2025 Tutorial)
How to Create a Map to Show Multiple Locations on Your Website (The Complete Guide)
Want to display a map with your store locations, event sites, or project portfolios on your website? While a single location is straightforward, plotting multiple points can be tricky. This guide will walk you through the manual process using the Google Maps Platform.
A Quick Warning: This method requires a Google Cloud account, enabling billing APIs, and some basic coding. It’s powerful but has a learning curve.
Method 1: Using the Google Maps Platform (The “Official” Way)
This method gives you full control but involves several technical steps.
Step 1: Set Up Your Google Cloud Project
- 1. Go to the [Google Cloud Console](https://console.cloud.google.com/).
- 2. Create a new project or select an existing one.
- 3. Enable Billing: You must enable billing on your project. Google provides a recurring $200 monthly credit, which typically covers a lot of usage for a simple map.
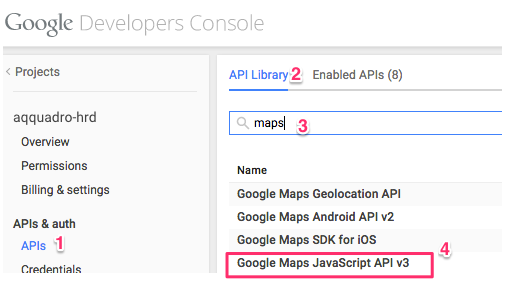
- 4. Enable the Necessary APIs: Navigate to the “APIs & Services > Library” and enable these two critical APIs:
- – Maps JavaScript API
- – Geocoding API (to convert addresses into coordinates)
Step 2: Get Your API Key
- 1. Go to “APIs & Services > Credentials”.
- 2. Click “Create Credentials” and select “API key”.
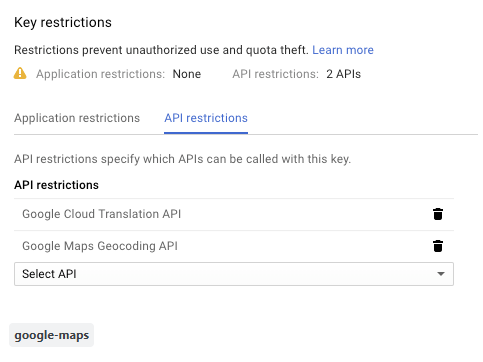
- 3. Restrict Your API Key! This is crucial for security. Click on the newly created key and restrict it to the Maps JavaScript API and Geocoding API. You can also restrict it by HTTP referrer (e.g., `yourwebsite.com/*`).
Step 3: Write the HTML and JavaScript Code
Now for the technical part. You’ll need to create an HTML file and add the following code. This code initializes the map, and adds multiple markers based on an array of locations.
Create a file named `multi-location-map.html` and paste this code:
<!DOCTYPE html>
<html>
<head>
    <title>My Multiple Location Map</title>
    <!-- Include the Maps JavaScript API with your key -->
    <script async defer src="https://maps.googleapis.com/maps/api/js?key=YOUR_API_KEY&callback=initMap"></script>
    <style>
        #map {
            height: 400px;
            width: 100%;
        }
    </style>
</head>
<body>
    <h1>Our Office Locations</h1>
    <div id="map"></div>

    <script>
        function initMap() {
            // Define the initial center of the map
            const mapCenter = { lat: 40.7128, lng: -74.0060 }; // New York City

            // Initialize the map
            const map = new google.maps.Map(document.getElementById("map"), {
                zoom: 10,
                center: mapCenter,
            });

            // Define your locations: Name, Lat, Lng
            const locations = [
                ['New York Office', 40.7128, -74.0060],
                ['Jersey City Branch', 40.7178, -74.0431],
                ['Brooklyn Warehouse', 40.6782, -73.9442]
            ];

            // Create an info window to share between markers.
            const infowindow = new google.maps.InfoWindow();

            // Loop through the locations and add markers to the map
            locations.forEach(([title, lat, lng], i) => {
                const marker = new google.maps.Marker({
                    position: { lat, lng },
                    map: map,
                    title: title, // Tooltip on hover
                });

                // Add a click listener to each marker to open an info window.
                marker.addListener("click", () => {
                    infowindow.setContent(title);
                    infowindow.open(map, marker);
                });
            });
        }
    </script>
</body>
</html>
Code language: HTML, XML (xml)
Replace `YOUR_API_KEY` in the script tag with the actual API key you generated in Step 2.
Step 4: Embed on Your Website
If you have a static website, you can simply upload this HTML file. If you’re using a CMS like WordPress, you might need to use a custom HTML block or a page builder module to paste this code.
The Challenge with This Method
As you can see, the process is technical and time-consuming:
- – You need to manage a Google Cloud account and billing.
- – You must handle API key security to avoid unexpected charges.
- – You have to manually code the latitude and longitude for every location.
- – Adding features like custom icons, clustering, or advanced info windows requires even more complex JavaScript.
There’s an Easier Way: Use MapsFun.com
Why go through all that complexity when you can achieve the same result—or even better—in minutes?
MapsFun.com is a dedicated tool designed specifically for this task. It eliminates all the technical hurdles:
- 1. No Coding Required: A simple, intuitive interface lets you search and add locations visually.
- 2. No API Keys: We handle all the backend complexity for you.
- 3. Rich Customization: Easily change map styles, add custom icons, and design beautiful info windows without writing a single line of code.
- 4. Get the Embed Code Instantly: Once your map is ready, you get a simple embed code to paste directly into your website, just like a YouTube video.
Stop wrestling with code and API configurations. Create a stunning, professional multi-location map in just a few clicks at MapsFun.com.