How to Make a Map with Multiple Locations (Quick Tutorial)
How to Create a Map with Multiple Locations for Your Website
Whether you’re showing store locations, event venues, or service areas, displaying multiple points on a map significantly enhances your website’s usability. While Google Maps provides the tools to build this functionality, the process involves technical complexity that can challenge non-developers.
Here’s your comprehensive guide to creating a multi-location map using the Google Maps JavaScript API.
Method 1: The Technical Approach Using Google Maps API
Step 1: Set Up Google Cloud Project and API Keys
First, you’ll need to configure access to Google’s mapping services:
- 1. Create a Google Cloud Project
- – Visit [Google Cloud Console](https://console.cloud.google.com/)
- – Create a new project or select an existing one
- – Enable billing (requires credit card, though $200 monthly credit covers most basic usage)
- 2. Enable Required APIs
- Navigate to “APIs & Services > Library” and enable:
- – Maps JavaScript API
- – Geocoding API (converts addresses to coordinates)
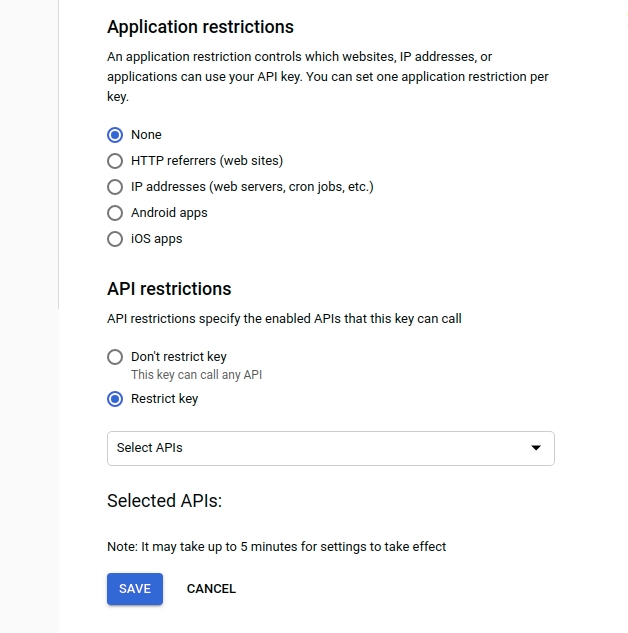
- 3. Generate and Secure Your API Key
- – Go to “APIs & Services > Credentials”
- – Click “Create Credentials” > “API Key”
- – Restrict the key to your domain and the specific APIs you’re using
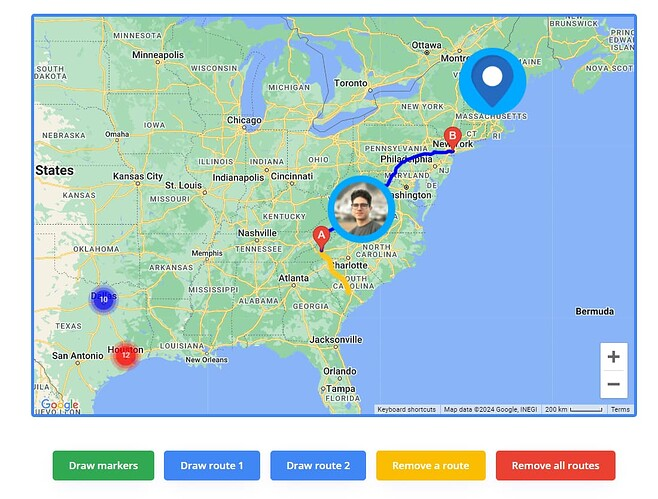
Step 2: Build the Map with HTML and JavaScript
Create a new HTML file and implement the map with this complete code example:
html
<!DOCTYPE html>
<html>
<head>
    <title>Multi-Location Business Map</title>
    <style>
        #map-container {
            width: 100%;
            max-width: 800px;
            margin: 20px auto;
            border-radius: 10px;
            overflow: hidden;
            box-shadow: 0 4px 12px rgba(0,0,0,0.1);
        }
        #map {
            height: 500px;
            width: 100%;
        }
        .map-title {
            text-align: center;
            font-family: Arial, sans-serif;
            color: #333;
            margin-bottom: 15px;
        }
    </style>
</head>
<body>
    <div id="map-container">
        <h2 class="map-title">Our Locations</h2>
        <div id="map"></div>
    </div>

    <!-- Load Google Maps API -->
    <script src="https://maps.googleapis.com/maps/api/js?key=YOUR_API_KEY_HERE&callback=initMap" async defer></script>

    <script>
        function initMap() {
            // Set initial map view
            const mapOptions = {
                zoom: 6,
                center: { lat: 39.8283, lng: -98.5795 }, // Center of US
                styles: [
                    {
                        "featureType": "administrative",
                        "elementType": "labels.text.fill",
                        "stylers": [{"color": "#444444"}]
                    }
                ]
            };

            const map = new google.maps.Map(document.getElementById('map'), mapOptions);

            // Define your locations
            const locations = [
                {
                    name: "New York Office",
                    position: { lat: 40.7128, lng: -74.0060 },
                    address: "123 Manhattan Ave, New York, NY"
                },
                {
                    name: "Chicago Branch",
                    position: { lat: 41.8781, lng: -87.6298 },
                    address: "456 Michigan Ave, Chicago, IL"
                },
                {
                    name: "Los Angeles Warehouse",
                    position: { lat: 34.0522, lng: -118.2437 },
                    address: "789 Sunset Blvd, Los Angeles, CA"
                },
                {
                    name: "Miami Showroom",
                    position: { lat: 25.7617, lng: -80.1918 },
                    address: "321 Ocean Dr, Miami, FL"
                }
            ];

            // Create info window
            const infoWindow = new google.maps.InfoWindow();

            // Add markers for each location
            locations.forEach(location => {
                const marker = new google.maps.Marker({
                    position: location.position,
                    map: map,
                    title: location.name
                });

                // Add click listener to show location details
                marker.addListener('click', () => {
                    infoWindow.setContent(`
                        <div style="padding: 10px;">
                            <h3 style="margin: 0 0 8px 0; color: #1a73e8;">${location.name}</h3>
                            <p style="margin: 0; color: #5f6368;">${location.address}</p>
                        </div>
                    `);
                    infoWindow.open(map, marker);
                });
            });

            // Adjust map bounds to show all markers
            const bounds = new google.maps.LatLngBounds();
            locations.forEach(location => {
                bounds.extend(location.position);
            });
            map.fitBounds(bounds);
        }

        // Handle API loading errors
        window.gm_authFailure = function() {
            alert('Google Maps failed to load. Please check your API key.');
        };
    </script>
</body>
</html>
Code language: HTML, XML (xml)
Replace `YOUR_API_KEY_HERE` with your actual Google Maps API key.
Step 3: Embed on Your Website
For static HTML sites, upload your file. For CMS platforms:
- WordPress:
- – Use a Custom HTML block
- – Or install a “Custom Code” plugin
- Shopify:
- – Edit your theme code
- – Add the HTML to a new section or page
- Wix/ Squarespace:
- – Use an HTML embed widget
- – Paste your complete code
The Challenges of This Approach
While powerful, the manual method presents significant hurdles:
- – Complex Setup: Google Cloud Console has a steep learning curve
- – Billing Management: You must monitor usage to avoid unexpected charges
- – Security Risks: Improperly secured API keys can lead to substantial costs
- – Code Maintenance: Every location change requires editing code
- – Browser Console Errors: Common issues like `InvalidKeyMapError` or `RefererNotAllowed` require technical troubleshooting
- – Mobile Responsiveness: Additional CSS and JavaScript needed for optimal mobile viewing
The Simple Alternative: MapsFun.com
Why spend hours configuring APIs and writing code when you can create beautiful, interactive maps in minutes?
MapsFun.com eliminates all the technical complexity:
- ✅ Truly No-Code – Visual editor with drag-and-drop functionality
- ✅ No API Setup – We handle all the backend infrastructure
- ✅ Instant Updates – Change locations in seconds without touching code
- ✅ Pre-designed Templates – Professional styles optimized for conversion
- ✅ Automatic Mobile Optimization – Perfect display on all devices
- ✅ Cost-Effective – No hidden costs or billing surprises
Create your perfect multi-location map today at MapsFun.com – the simplest way to showcase your locations without the technical headache.