How to Create Google Maps with Multiple Points (2025 Tutorial)
How to Create a Google Map with Multiple Points: The Technical Guide
Embedding an interactive map with multiple locations on your website can dramatically improve user experience. Whether you’re showcasing store locations, event venues, or project sites, a custom map makes your content more engaging. This guide will walk you through the official method using the Google Maps JavaScript API.
This method requires technical knowledge, including setting up a Google Cloud account and writing JavaScript code.
Method: Building with the Google Maps JavaScript API
This approach offers maximum flexibility but involves several complex steps.
Step 1: Obtain Your Google Maps API Key
This is the most critical and often confusing part of the process.
- 1. Access Google Cloud Console: Go to [https://console.cloud.google.com/](https://console.cloud.google.com/).
- 2. Create a New Project: Click the project selector at the top and create a new project with a descriptive name (e.g., “Multi-Location Map”).
- 3. Enable Billing: You must enable billing on your project. Don’t panic—Google provides a $200 monthly credit, which typically covers significant map usage.
- 4. Enable Required APIs: Navigate to “APIs & Services” > “Library” and enable these two essential services:
- –Maps JavaScript API
- –Geocoding API (necessary for address conversion)
You must enable the correct APIs in the Google Cloud Console library.
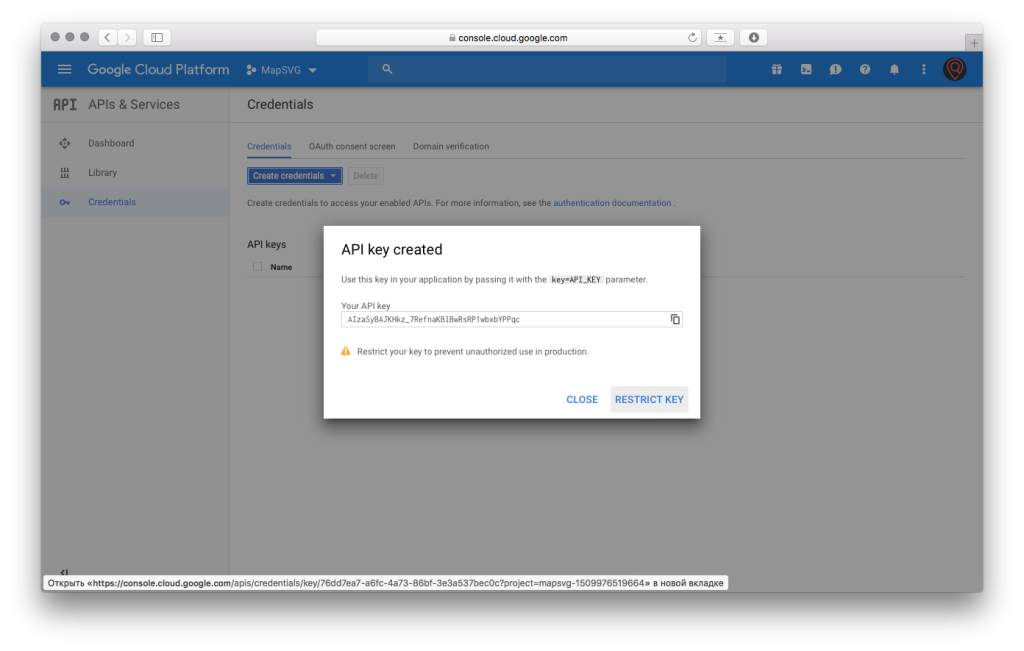
- 5. Generate and Secure Your API Key: Go to “APIs & Services” > “Credentials”. Click “Create Credentials” and select “API key”. Crucially, restrict this key to “HTTP referrers” and limit it to only the “Maps JavaScript API” and “Geocoding API” to prevent unauthorized use.
Step 2: Develop the HTML Page with Map Code
Create a new file called `multi-point-map.html` and use the following code. This script creates a map, defines locations in an array, and uses a loop to place markers.
html
<!DOCTYPE html>
<html>
<head>
    <title>Our Global Offices</title>
    <meta name="viewport" content="width=device-width, initial-scale=1.0">
    <!-- Load the Google Maps API with your key -->
    <script async defer src="https://maps.googleapis.com/maps/api/js?key=YOUR_API_KEY_HERE&callback=initMap"></script>
    <style>
        #map-container {
            width: 100%;
            max-width: 1200px;
            margin: 20px auto;
            padding: 20px;
            background: #fff;
            border-radius: 10px;
            box-shadow: 0 2px 10px rgba(0,0,0,0.1);
        }
        #map {
            height: 500px;
            width: 100%;
            border-radius: 8px;
        }
    </style>
</head>
<body>
    <div id="map-container">
        <h1>Our Global Presence</h1>
        <p>Explore our offices and service centers worldwide.</p>
        <div id="map"></div>
    </div>

    <script>
        function initMap() {
            // Set initial map view to show all markers
            const map = new google.maps.Map(document.getElementById("map"), {
                zoom: 3,
                center: { lat: 30, lng: 0 }, // Centered to show multiple continents
                mapTypeControl: true,
                streetViewControl: false
            });

            // Define locations: [Title, Latitude, Longitude, Address]
            const locations = [
                ['New York HQ', 40.7128, -74.0060, '123 Main St, New York, NY'],
                ['London Office', 51.5074, -0.1278, '456 Park Lane, London, UK'],
                ['Tokyo Branch', 35.6762, 139.6503, '789 Sakura Ave, Tokyo, Japan'],
                ['Sydney Office', -33.8688, 151.2093, '321 Harbour St, Sydney, AU']
            ];

            // Create bounds to auto-zoom to show all markers
            const bounds = new google.maps.LatLngBounds();
            const infowindow = new google.maps.InfoWindow();

            locations.forEach(([title, lat, lng, address]) => {
                const position = { lat, lng };
                const marker = new google.maps.Marker({
                    position: position,
                    map: map,
                    title: title
                });

                // Extend bounds for each marker
                bounds.extend(position);

                // Add click event to show info window
                marker.addListener('click', () => {
                    infowindow.setContent(`
                        <div class="info-window">
                            <h3>${title}</h3>
                            <p>${address}</p>
                            <button onclick="alert('Contacting ${title}')">Get Directions</button>
                        </div>
                    `);
                    infowindow.open(map, marker);
                });
            });

            // Auto-fit map to show all markers
            map.fitBounds(bounds);
        }
    </script>
</body>
</html>
Code language: HTML, XML (xml)
Replace `YOUR_API_KEY_HERE` with the restricted API key from Step 1.
Step 3: Implement on Your Website
Test the map by opening your HTML file in a browser. For implementation:
- – Static websites: Upload the HTML file to your server
- – WordPress/Wix/Squarespace: Use a custom HTML/CSS block to insert the code
- – Advanced setups: Integrate the JavaScript logic into your existing framework
The Reality of This Approach
While this method provides complete control, it presents significant challenges:
- – Steep Learning Curve: Requires comfort with cloud platforms and JavaScript
- – Billing Complexity: Mandatory billing setup deters many users
- – Security Risks: Unsecured API keys can lead to substantial costs
- – Maintenance Overhead: Every location change requires code updates
- – Limited Features: Advanced functionality requires extensive additional coding
The Simple Solution: MapsFun.com
Why navigate this technical maze when you can achieve professional results in minutes?
MapsFun.com eliminates all these complexities:
- 1. No-Code Interface: Click to add points, search addresses, and customize with our visual editor
- 2. Zero Configuration: No API keys, billing accounts, or security concerns
- 3. Advanced Features: Custom markers, multiple map styles, and rich info windows
- 4. Instant Deployment: Get optimized embed code for any platform
- 5. Automatic Updates: Modify your map anytime without touching code
Stop wrestling with APIs and code. Create beautiful, interactive multi-point maps effortlessly at MapsFun.com